wordpress进阶教程(三十八):wordpress后台编辑器分区域编辑
文章翻译自:http://wp.smashingmagazine.com/2011/10/14/advanced-layout-templates-in-wordpress-content-editor/
本工作室实测。
很多网站开发人员,使用wordpress建设网站,但经常碰到使用的客户没有一点点html知识的,所以得经常为客户提供更新或更改服务。TinyMCE编辑器在后台编辑的时候,仅仅提供了一些简单的功能,比如列表、加粗、颜色等,但是如果需要做出布局比较复杂的文章,则需要一定的Html知识。
本教程将会教会你,怎样让不懂一点点html知识的客户也能够在后台的编辑器中添加各种复杂的布局内容的文章,比如多列、图文混排等等。
效果: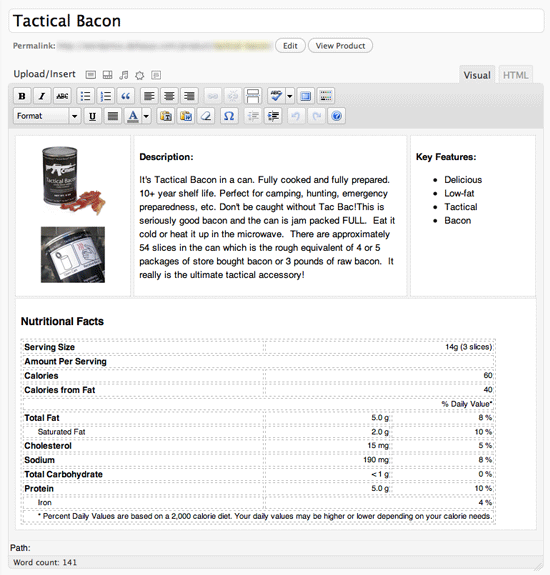
创建一个已定的布局
实际上在这里我们要做的就是给wordpress编辑器插入一个已经写好的一个布局的html代码,我们可以通过wordpress的'default_content'过滤器来个文章内容的编辑器设置一个默认的内容(这个内容就是文章布局的Html代码)。
后台代码
添加以下代码到你的主题的functions.php文件中,当我们在后台点击新建文章的时候,编辑器中默认就插入了两个div,class类名分别为 content-col-main和content-col-side,我将使用wp3.8.1 twentyfourteen主题测试。
注意事项:
1.上面代码中的default_content过滤器只有在新建文章的时候触发,对于已经存在的文章或者页面无效。
2.上面代码中的 是空格的html实体名称,不是必须的。
添加完上面的代码后,后台点击新建文章,可视化模式下可以看到两行字,文本模式下则可以看到我们设置的默认布局代码,如图:
这个时候还没有任何效果,所以接下来给编辑器内部的布局增加css样式。
添加以下代码到主题的functions.php文件。注意,下面的代码是给主题的编辑器添加自定义样式支持,很多主题都已经有这个功能了,所以请先搜索以下代码
上面代码中的add_editor_style()函数,用于给后台的编辑器增加一个css样式文件,所以接下来在主题文件夹下新建一个editor-style.css(twentyfourteen主题已经添加此功能支持,样式文件为 css/editor-style.css 所以我就不新建了),然后在css文件中添加如下css代码
添加代码之后,效果如下图 到这里,一个两列布局的文章模板已经到你的编辑器中了,你可以更改钱吗default_content过滤器中的默认内容和editor-style.css文件来添加样式,创建一个更加复杂的,符合你需求的模板。
如下
给特定的文章类型创建特定的布局模板
上面的代码直接应用到你的所有内容:文章、页面、自定义文章类型...所有会显示TinyMCEbian编辑器的地方。这恐怕不是我们想要的,接下来的内容将让你可以给不同的或者特定的内容增加布局。
上面的代码示例给不同的文章类型输出不同的默认布局代码,请根据实际需求更改上面的代码。
同样的,也可以给不同的文章类型加载不同的css文件。示例代码如下
当然,还有第二种方法,你也可以通过以下方法来为不同的文章类型加载不同的css,
- 没有章节