wordpress进阶教程(三十七):wordpress后台添加幻灯片板块


本站框架有提供添加幻灯片的步骤,请直接前往本站 框架栏目->幻灯片插件。

网页幻灯片(slider)应用很广泛,很多博客也喜欢在首页弄一个特色文章切换。

不管是文章切换还是图片切换,或者是图文混合切换,在后台新建一个独立的幻灯片板块就非常方便。

如图:slider


要是说明的是,这个里面有个排序幻灯片功能,我也不记得是从哪里弄过来的,反正已经很久远了,记不清了。

首先是后台的实现,第一步,需要新建一个文章类型。

提醒:你可以直接将下面的代码添加到主题的functions.php中,也可以新建一个文件。本工作室测试时,使用wp3.8.1 twentyfourteen主题,所以我再twentyfourteen主题的inc文件夹下,新建一个post_type.php文件。然后在twentyfourteen主题的functions.php文件(可以放到最前面)加入以下代码,包含post_type.php文件

require get_template_directory() . '/inc/post_type.php'; add_action('init', 'ashu_post_type'); function ashu_post_type() {     /**********幻灯片*****************/     register_post_type( 'slider_type',         array(             'labels' => array(                 'name' => '幻灯片',                 'singular_name' => '幻灯片',                 'add_new' => '添加',                 'add_new_item' => '添加新幻灯片',                 'edit_item' => '编辑幻灯片',                 'new_item' => '新幻灯片'             ),         'public' => true,         'has_archive' => false,         'exclude_from_search' => true,         'menu_position' => 5,         'supports' => array( 'title','thumbnail'),         )     ); } add_filter( 'manage_edit-slider_type_columns', 'slider_type_custom_columns' ); function slider_type_custom_columns( $columns ) {     $columns = array(         'cb' => '<input type="checkbox" />',         'title' => '幻灯片名',         'haslink' => '链接到',         'thumbnail' => '幻灯片预览',         'date' => '日期'     );     return $columns; } add_action( 'manage_slider_type_posts_custom_column', 'slider_type_manage_custom_columns', 10, 2 ); function slider_type_manage_custom_columns( $column, $post_id ) {     global $post;     switch( $column ) {         case "haslink":             if(get_post_meta($post->ID, "slider_link", true)){                 echo get_post_meta($post->ID, "slider_link", true);             } else {echo '----';}                 break;         case "thumbnail":                 $slider_pic = get_post_meta($post->ID, "slider_pic", true);                 echo '<img src="'.$slider_pic.'" width="95" height="41" alt="" />';                 break;         default :             break;     } } <?php $args = array(     'post_type'=>'slider_type', ); query_posts($args); if( have_posts() ) : ?> <div id="banner">     <div id="show">     <?php     while( have_posts() ) : the_post();         $image_url = get_post_meta($post->ID,'slider_pic',true);         if($image_url!=''){ ?>         <div class="show_item">             <a href="<?php echo get_post_meta($post->ID,'slider_link',true);?>">                 <img src="<?php echo $image_url; ?>" alt="<?php the_title(); ?>" />             </a>         </div>     <?php } endwhile; ?>     </div> </div> <?php endif; wp_reset_query(); ?>

这样接下来的代码就都添加到post_type.php文件即可。

首先创建一个自定义文章类型

require get_template_directory() . '/inc/post_type.php'; add_action('init', 'ashu_post_type'); function ashu_post_type() {     /**********幻灯片*****************/     register_post_type( 'slider_type',         array(             'labels' => array(                 'name' => '幻灯片',                 'singular_name' => '幻灯片',                 'add_new' => '添加',                 'add_new_item' => '添加新幻灯片',                 'edit_item' => '编辑幻灯片',                 'new_item' => '新幻灯片'             ),         'public' => true,         'has_archive' => false,         'exclude_from_search' => true,         'menu_position' => 5,         'supports' => array( 'title','thumbnail'),         )     ); } add_filter( 'manage_edit-slider_type_columns', 'slider_type_custom_columns' ); function slider_type_custom_columns( $columns ) {     $columns = array(         'cb' => '<input type="checkbox" />',         'title' => '幻灯片名',         'haslink' => '链接到',         'thumbnail' => '幻灯片预览',         'date' => '日期'     );     return $columns; } add_action( 'manage_slider_type_posts_custom_column', 'slider_type_manage_custom_columns', 10, 2 ); function slider_type_manage_custom_columns( $column, $post_id ) {     global $post;     switch( $column ) {         case "haslink":             if(get_post_meta($post->ID, "slider_link", true)){                 echo get_post_meta($post->ID, "slider_link", true);             } else {echo '----';}                 break;         case "thumbnail":                 $slider_pic = get_post_meta($post->ID, "slider_pic", true);                 echo '<img src="'.$slider_pic.'" width="95" height="41" alt="" />';                 break;         default :             break;     } } <?php $args = array(     'post_type'=>'slider_type', ); query_posts($args); if( have_posts() ) : ?> <div id="banner">     <div id="show">     <?php     while( have_posts() ) : the_post();         $image_url = get_post_meta($post->ID,'slider_pic',true);         if($image_url!=''){ ?>         <div class="show_item">             <a href="<?php echo get_post_meta($post->ID,'slider_link',true);?>">                 <img src="<?php echo $image_url; ?>" alt="<?php the_title(); ?>" />             </a>         </div>     <?php } endwhile; ?>     </div> </div> <?php endif; wp_reset_query(); ?>

添加完之后,即可在后台看到新创建的文章类型:slider2


当然,仅仅这样,一个幻灯片只有标题肯定是不行的。所以需要创建一些自定义字段,给文章添加自定义字段是一个比较长的话题,可参考或直接使用我们的教程:wordpress进阶教程(十):后台创建自定义面板类文件,关于如何添加自定义字段,这里就跳过。

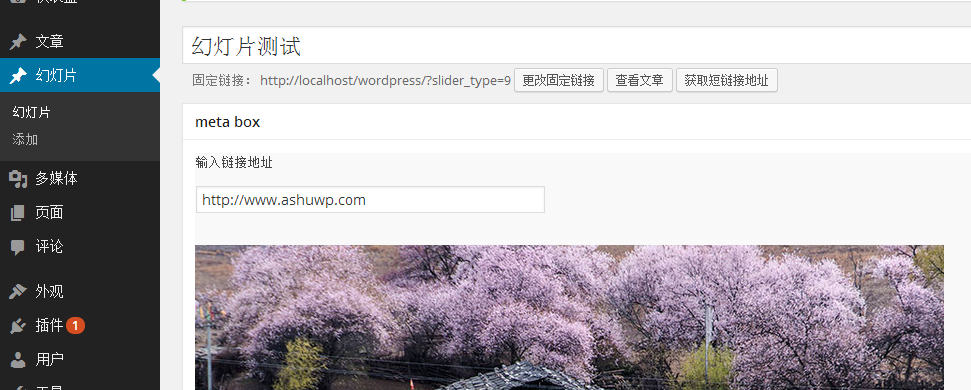
我使用本工作室发布的类文件,添加了两个自定义字段,分别为  链接地址-slider_link    图片地址-slider_pic。如图slider3


如此,后台即可方便添加幻灯片了。

第二步:在幻灯片管理页面预览幻灯片信息。继续在post_type.php中添加以下代码:

require get_template_directory() . '/inc/post_type.php'; add_action('init', 'ashu_post_type'); function ashu_post_type() {     /**********幻灯片*****************/     register_post_type( 'slider_type',         array(             'labels' => array(                 'name' => '幻灯片',                 'singular_name' => '幻灯片',                 'add_new' => '添加',                 'add_new_item' => '添加新幻灯片',                 'edit_item' => '编辑幻灯片',                 'new_item' => '新幻灯片'             ),         'public' => true,         'has_archive' => false,         'exclude_from_search' => true,         'menu_position' => 5,         'supports' => array( 'title','thumbnail'),         )     ); } add_filter( 'manage_edit-slider_type_columns', 'slider_type_custom_columns' ); function slider_type_custom_columns( $columns ) {     $columns = array(         'cb' => '<input type="checkbox" />',         'title' => '幻灯片名',         'haslink' => '链接到',         'thumbnail' => '幻灯片预览',         'date' => '日期'     );     return $columns; } add_action( 'manage_slider_type_posts_custom_column', 'slider_type_manage_custom_columns', 10, 2 ); function slider_type_manage_custom_columns( $column, $post_id ) {     global $post;     switch( $column ) {         case "haslink":             if(get_post_meta($post->ID, "slider_link", true)){                 echo get_post_meta($post->ID, "slider_link", true);             } else {echo '----';}                 break;         case "thumbnail":                 $slider_pic = get_post_meta($post->ID, "slider_pic", true);                 echo '<img src="'.$slider_pic.'" width="95" height="41" alt="" />';                 break;         default :             break;     } } <?php $args = array(     'post_type'=>'slider_type', ); query_posts($args); if( have_posts() ) : ?> <div id="banner">     <div id="show">     <?php     while( have_posts() ) : the_post();         $image_url = get_post_meta($post->ID,'slider_pic',true);         if($image_url!=''){ ?>         <div class="show_item">             <a href="<?php echo get_post_meta($post->ID,'slider_link',true);?>">                 <img src="<?php echo $image_url; ?>" alt="<?php the_title(); ?>" />             </a>         </div>     <?php } endwhile; ?>     </div> </div> <?php endif; wp_reset_query(); ?>

slider4


slider4


就这样后台部分完成。

前台如何输出呢?使用不同的jquery slider插件会有不同的html输出格式,仅提供一个参考:

require get_template_directory() . '/inc/post_type.php'; add_action('init', 'ashu_post_type'); function ashu_post_type() {     /**********幻灯片*****************/     register_post_type( 'slider_type',         array(             'labels' => array(                 'name' => '幻灯片',                 'singular_name' => '幻灯片',                 'add_new' => '添加',                 'add_new_item' => '添加新幻灯片',                 'edit_item' => '编辑幻灯片',                 'new_item' => '新幻灯片'             ),         'public' => true,         'has_archive' => false,         'exclude_from_search' => true,         'menu_position' => 5,         'supports' => array( 'title','thumbnail'),         )     ); } add_filter( 'manage_edit-slider_type_columns', 'slider_type_custom_columns' ); function slider_type_custom_columns( $columns ) {     $columns = array(         'cb' => '<input type="checkbox" />',         'title' => '幻灯片名',         'haslink' => '链接到',         'thumbnail' => '幻灯片预览',         'date' => '日期'     );     return $columns; } add_action( 'manage_slider_type_posts_custom_column', 'slider_type_manage_custom_columns', 10, 2 ); function slider_type_manage_custom_columns( $column, $post_id ) {     global $post;     switch( $column ) {         case "haslink":             if(get_post_meta($post->ID, "slider_link", true)){                 echo get_post_meta($post->ID, "slider_link", true);             } else {echo '----';}                 break;         case "thumbnail":                 $slider_pic = get_post_meta($post->ID, "slider_pic", true);                 echo '<img src="'.$slider_pic.'" width="95" height="41" alt="" />';                 break;         default :             break;     } } <?php $args = array(     'post_type'=>'slider_type', ); query_posts($args); if( have_posts() ) : ?> <div id="banner">     <div id="show">     <?php     while( have_posts() ) : the_post();         $image_url = get_post_meta($post->ID,'slider_pic',true);         if($image_url!=''){ ?>         <div class="show_item">             <a href="<?php echo get_post_meta($post->ID,'slider_link',true);?>">                 <img src="<?php echo $image_url; ?>" alt="<?php the_title(); ?>" />             </a>         </div>     <?php } endwhile; ?>     </div> </div> <?php endif; wp_reset_query(); ?>